Sunday 7 October 2012

Another Lynne Perrella Wall Hanging

This time it was for the swap at our monthly Stamp Club. The theme was a wall hanging for an art room.
I used the same oil pastel resist technique and Cuttlebug border as on my recent first attempt on which I also used a Lynne Perrella stamp. I enjoyed that so much I thought I would do another similar one.

The piece of board behind is just a piece of corrugated cardboard painted and crackled using Americana Weathered Wood crackle medium. I have to say this is the easiest way to get a crackle effect I have yet tried!
I used a length of fine chain I had in my stash to hang it and some lovely lime green wire to suspend the scrabble tiles on. The tiles were distressed using alcohol inks and I also stamped around the edges to give them an antique look, using black Stazon.


After spraying the old glossy photo paper I used for the main image part with Dylusions inks and drying, I then stamped the script after simply spraying the stamp with a mist of water....you have to try this, it's a great effect!
Then I ran the edges through my Cuttlebug and finished off with some Rub n Buff which I also ran around the edge of the back board.


The top scroll is made from a bit of dishwasher tablet cardboard box, painted with various acrylic paints to make it look aged and a couple of gems added. The die is a Sizzix Bigz Die (Corner Flourish #2).


You can see here that I made the bottom border in the same way using coloured staples to attach it to the board. I love this Tim Holtz Alterations Die (Scallops) and think I need a few more from the 'On The Edge' collection. This is the only one I own at the moment.


I got to swap with Claire and this is the fab wall hanging I got in return.....love the font for the sentiment and all those fab danglies!!!
 Right at this stage in my life, I don't seem to be able to find much time to do art and I do so miss it but I hope, with the colder months ahead, I'll get more time to play!


Friday 14 September 2012

Craft Barn Art Journal Challenge

Oh, go on then - let's throw caution to the wind and submit my next two pages to the Craft Barn Art Journal Challenge.
I think I'm improving, helped a lot by my new purchases of Dylusions stamps and spray inks which I bought at the summer Craft Barn Extravaganza. 
I made these pages during those long, long weeks of summer rain that never seemed to end but it took me so long to have time to complete that we were back in lovely summer weather by the time I finished!
I drew the frog's body, raindrops and lily pad myself.....you can probably tell, LOL!

Let the Journal begin!

Okay, so I have begun to have a go at my first art journal, having bought a few blank books for the purpose last time I was in London.
This is the cover I made using the black of the cover as my background colour.
 Well, it IS my first attempt - LOL! A bit 'busy' !!! Never mind, we live and learn.
And I'm going to even, bravely, show you my first ever journal page I did way back in June - baby steps!!.....

Hurrah! Got to Stamp Club!!!

Last month I actually made it to Stamp Club and also managed to make the swap - which was the least I could do as it was my turn to host.
I chose a domino accordian book with the theme 'Past Times' and this is the one I made.....
 I had fun trying to make it look as though it had just been dug up from some ancient site, using, amongst other things, a Verdigris E.P.


Monday 6 August 2012

Shadow Box

Here's another Stamp Club project which never made it to Stamp Club!
I went to watch the Test Cricket at the Oval with my husband and didn't get back in time for Club.
Anyway, this is made from part of  an old costume jewellery box. Gessoed and painted with Eco paints and Americana Weathered Wood Crackle Medium. I stamped the box with a floral background stamp by Crafty Individuals and a floral cluster by Penny Black. The sentiment is by Paper Artsy.
 The little boy and the main background are from one stamp. I love this stamp but I can't say who makes it as I bought it on EBay. I layered the flowers and the boy and also layered flowers across the boy image on the background piece to hide him at the back.
This is my first attempt at a Shadow Box - it was fiddly but a challenge.


Saturday 21 July 2012

After the Craft Barn....

I went to the summer Craft Barn Extravaganza a few weeks ago. What a great crafting event and a great chance to meet up with all my lovely forum friends from Cardmaking Paradise too!
Apart from the social aspect and lots of laughs, there were, as always, some great demos going on so we all went home with new goodies from the shop but a huge amount of inspiration and new techniques to try.

I bought yet more Dylusions stamps plus all her ink sprays, lots of bits and pieces plus two sublime stamp sets from Paper Artsy by Lynne Perrella.
I made a couple of things with those already - the first was a wall hanging, implementing Helen Chilton's oil pastel resist with dry embossed egdes.
I hadn't reckoned on my piece of card (which was just a backing from some craft packaging - hence the hanging hole, ready made!) actually being too big to go through widthways on my Cuttlebug so I shoved it through anyway and I really liked the distressed edges this created - LOL!
I used fusible film for parts of the stamp and added some tiny sequins from an evening dress - I always keep the spares they give you in a little bag and these ones were perfect for this as they are antique finish. 
 Here you can see the great detail that still came through even when ironed onto fusible film.
I love this effect!


I used Dylusions ink sprays on the card which I think look delicious and I picked out the peaks of the dry embossing in places with some gold acrylic Eco Paint and some ruby Rub n Buff.


I then made a card using another of the Lynne Perrella stamps which I painted with acrylics, used those sequins again and the sun is again using fusible film which I coloured on the back with gold pen. The tape across the card is by 7 Gypsies and is like a masking tape texture.
The background to the stamped piece is, again, made using Dylusions ink sprays plus a little Crafty Notions white paint spray.


On both these projects, I stuck the sequins down using glitter glue which really gives a great jewelled look to the centre of the sequin.


Thanks for looking.

Contrasts!

I've been  away for a while and unable to do any crafting but, last month, I did make this card for a very dear crafting friend in America for her birthday. I ordered her some IndigoBlu stamps for her, belated!, birthday present so, of course, had to buy a couple of stamps for me at the same time....you know how it is!!!
This card's made using the Anemone Corner stamp which was even bigger than I had expected but works well on a large square card, repeating the corner twice.
As you can see, I layered up bits of the flowers and coloured them with watered down Distress Inks. The sentiment was one of a set sent to me for MY birthday by the same friend and is from a polymer set from Crescendoh by Christine Mason Miller and called 'Ordinary Sparkling Sentiments'.
This card was quite a departure for me as I don't normally do pretty but I really enjoyed making it.


I curled the petals up as well - although I'm never sure that things like that will survive being put in an envelope and sent in the mail. It probably ended up flattened!


By complete contrast, at June's local Stamp Club there was an art doll swap - the template was provided by the host and she got it from here.
I so enjoyed playing with this and immediately knew I would be using a head from my new Dylusions stamps!
It also didn't take more than a split second to decide that my doll would be a showgirl....as I used to be a dancer and thought I could make a mini me, well a mini me as I was in a past life anyway!!!!
Unfortunately I didn't actually make that Stamp Club meet but here she is in all her glory. Meet Lola!!!!.............
 I love the look of her fishnet tights and silver shoes yet they were so easy to do.


 I used a Crafty Individuals stamp for the buildings on her leotard, a mini Inkadinkado stamp for her tattoo and Elusive Images swirly stamps for her feathers. Another Elusive Images stamp is the pattern on her long gloves.


I'd like to make another doll but think I would adapt this template so that the body doesn't look so strange when you move the legs....if you see what I mean!!!!???
Anyway, there are plenty of templates out there online. Get out there and give it a try....it's so much fun!

Monday 14 May 2012

The Other Aperture Card

Finally, now we're back from our wonderful holiday in the U.S., here's the other aperture card I began making at Stamp Club and finished just in time to send before we flew off to Phoenix.
 

I used Stampington's 'Arched Glass' stamp to make the aperture, cutting the middle out and stamping it again on acetate.
The other stamps used are 'Luciana' by Lynne Perella, now made by Stampington and my much loved cherubs stamp by Just For Fun.
The sentiment is by Hero Arts and the corner stamps by Crafty Individuals.
I coloured the acetate image with Sharpie and Promarker pens and added some little paper flowers and punched leaves to brighten up the whole look of the card. I also stamped some tiny flowers in black by the paper flowers with a stamp I use so much which I think came from a Hero Arts Alpha set.

I'm about to post some photos from my trip on my photo blog - see link on the right side of this blog. Do go over and take a look....we saw some simply stunning scenery on our travels.

Tuesday 10 April 2012

Apertures

At our last local Stamp Club get together the theme was 'apertures'. Finding stamps that could be used for apertures was suggested by our illustrious leader, Clare. I have just finished this card which I began making at club and I'm quite pleased with the way it turned out.....
The printed image is from  Crafty Individuals 'People and Places 2' miniatures book in which there are loads of absolutely gorgeous coloured images. I made the aperture from two Invoke Arts stamps from the Nicho Frames set.
I added some little 'gold' mosaic tiles and a punched star made from book text.
The sentiment comes from a new set I recently was given by my crafting friend in America. It's made by Crescendoh, designed by Christine Mason Miller and called 'Ordinary Sparkling Sentiments'. I have long had this set of stamps on my wishlist and I'm so pleased to have it in my grubby little mitts at last.....thank you Steph!
For this card I cut the words up so as to fit them into the space I had. They were stamped onto some Basic Grey cardstock and edged with Spiced Marmalade Distress Ink.
Finally, here is a photo of the inside of the card which I left simple and just added a little detail around the aperture using more stamps from the same Invoke Arts set.
I have another part-finished aperture card from the same club session. I hope to get that made soon - watch this space but don't hold your breath - LOL !!!

Friday 6 April 2012

Eastertime!!!

Two little cards made with the IndigoBlu freebie stamp from April's Craft Stamper magazine - I love this little stamp!
I was just given some tiny Bazzill shaped card blanks as a present by a dear crafting friend in the U.S. and, by complete coincidence, they matched the shape of the only Spellbinders Nestabilities die set I have.
Couldn't wait to put the two together and here is the result...some little Easter cards.
My friend also sent me some Tsukinecko Goosebumps spray which I hadn't tried before. I have to say I rather like the effect of this, sprayed on randomly then inked over and polished up. I also tried stamping with it to use as a resist but found that it went rather splodgy. Also don't see the need to use it for that as we have clear embossing powder which does the job much better. But this technique gives a really great look to background paper. Click on the photos to see a larger version....

Another 'Paradise' template!

I had to make a card for a boy's 11th birthday this week so over I went to Sara's Cardmaking Paradise mag to look for a number template....she did not let me down and I found this great funky 11 shaped card.

I embossed the whole thing using one of Tim Holtz's embossing folders then printed and cut out another single number 1 which I embossed using another of Tim's folders. Though you can't see it here, I then highlighted some of the circles with Glossy Accents and some of the speckles with Distress Stickles in Firde Brick.
The sentiment circle was made from a Tim Holtz stamp, heat embossed with Cosmic Shimmer Lava Black Aurora and topped with a Hero Arts stamped sentiment. I tried to get as close to Westham footbal club's colours as I could using Adirondack Cloud Blue and Archival Plum inks.
Because my printer can't handle thick card, I found a great way to transfer Sara's templates onto card. I printed the template onto tracing paper then turned it face down on the thick card and ran my embossing stylus around the lines....to my surprise and delight, they transferred onto the card beautifully!
Thanks, Sara, for another great template!!!

Mothers Day Project

Over on Cardmaking Paradise online magazine, there is a great template - amongst many! - for a Mothers Day card in its own little box. It even has alternative wording of Mom and Mor. I made one for my mum and also as a member of the Design Team at Cardmaking Paradise and here it is.........
I used Bazzill and a gorgeous 12x12 double-sided scrapbooking paper by Prima called 'Parsley Place' from the Madeline Collection.
Sara, at Gardmaking Paradise, gives great step-by-step instructions on how to assemble all her shaped cards etc and you simply download the PDF template or whichever version you need.
So, we also made a little box into which this card fits beautifully and, on opening the box, the card pops up out of the box.

What I loved about this patterned cardstock was that it has that layered look without having to cut up any bits and layer them up!
Here's the outside of my box all done up with ribbon and a tiny tag I also made from the same card...
I didn't have a diecut label for the top of the box so I simply cut this from a rectangle using the old-fashioned scissors we used to use!!! I edged this with Distress Stickles Rock Candy which I also used on details of the floral bits on the actual card. I added some stick on min pearls to complete the look.


Salt, Twinkling H2Os and water

I recently made a card, playing with art journalling style a bit but also using a technique featured in the April issue of Craft Stamper magazine by Sheena Douglas. It involves spodging Twinkling H2Os onto spritzed card then spritzing again to make them run together and while this is wet, adding some sea salt which you brush off when all is dry.
I haven't used my H2Os much lately so it was nice to get those lovely colours out again. I also used them to paint in my outline leaves - which are hand drawn somewhat in the style of Dyan Reaveley. I covet almost ALL of her stamp sets and they are firmly on my wishlist.
So, here's the card - using an Artemio flower stamp which I embossed in detail white....
The rows of circles are a Claudine Hellmuth stamp from the 'Dwellings' Creative Layers polymer set which I then highlighted with a white pen.

I shaded around the embossed flower with a Derwent pencil - I think it was an Inktense one but could have been a Coloursoft.
I'm really enjoying drawing a few things onto my work these days and also did the wording freehand....as you could probably guess, LOL! Yes, need to do some more work on my lettering!!!
You can see here the effect of the salt on the paint.

Wednesday 21 March 2012

Mint Tin Swap

At our last local Stamp Club meet-up, we swapped altered mint tins - tiny tins they were so it was quite a challenge.
The theme to follow was 'Wings'.....a great excuse for my favourite subject for art which is angels.
I used a test pot of housepaint which more or less matched the base of the tin - a turquoise colour and also used Distress Crackle in Weathered Wood.

The shrink plastic wings are made using  Invoke Arts wing stamps and the cherub stamp is by Just For Fun. I also used a Paper Artsy mini of medieval calligraphy and the 'believe' word comes from an Inkadinkado polymer Inchies set.

Around the edge of the tin I stamped a Kelly Panacci border stamp....

Yes, it's mis-stamped in places but I actually like a bit of inaccurate stamping for this sort of thing. Helps to give it an aged look!


I even painted the base of the tin, first with gesso and then roughly went over this with a brushful of Pearl Dabber paint. This I stamped on with an Invoke Arts ATC background stamp and picked out some detail with a  Sakura Stardust pen.


....and, on the inside, I used a bit of Paper Artsy Christmas paper ( I love this set of papers so much!) on which I handwrote the angel sentiment, adding some accent beads around the edges and three pearl dots made with a Pearl Pen by Viva Decor.


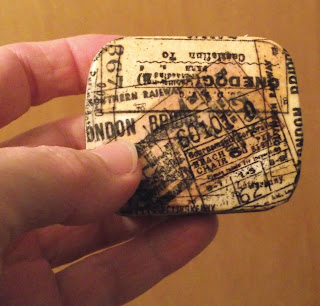
My swap was this fabulous ticket tin - which even had some tickets inside for me to use, made by Jacqui.....
I love the way Jacqui has layered all the ticket stamps over each other and the whole thing has a heavily lacquered look, like an old suitcase. Beautiful !
I photographed it in my hand to show just how small these mint tins were.
This is the base of her tin....
Here are the little tickets I found inside...
I've been looking at some wonderful art journaling pages and blogs for some time now and am really intching to have a go myself. So I'm on the lookout for a good blank book to get me started. I hope it won't be too long before you can see my frst attempts on here. Bye for now!

Wednesday 29 February 2012

Cardmaking Paradise domino swap

I recently joined in an altered domino swap on Cardmaking Paradise craft forum. I haven't  altered a domino in years and really enjoyed making mine. I chose a big chunky one from my stash and made it into a pendant, also decorating a box for it to go in and making a card for whoever was the recipient.

The stamp I used is one of my absolute favourites that I've had for some years now. It stamps with such minute detail and is from Third Coast Stamps. I stamped her in Stazon and then coloured bits in using mini Sharpie markers that I bought in a stationery store.

I used some French text from a paperback book for part of my background and painted over with a test pot of Craig & Rose 'Opulence' paint in Sapphire. It has a gorgeous lustre. I also added a sentiment stamp around one side saying 'Reach For The Stars' which I got from Crafty Individuals and adhered some odd little scraps of leafing foil randomly. 
Then it was time to sit back and wait for the deadline and then for my swap to arrive in the mail.
I was thrilled to open my domino - or two dominos actually! - which were the covers of a gorgeous mini book. Most beautifully made by Maggie - thanks so much for it, Maggie...I really LOVE it!!!

Bear in mind that these dominos that make the front and back cover of the book measure a mere inch and a half by three quarters of an inch! I love the sky background and it has gorgeous gold edges which you can just about see in my photo. A real work of art!

Maggie couldn't have chosen a better subject matter for me as I really love birds. Coincidentally Maggie recently sent me a beautiful birthday card which goes perfectly with this little book. Which reminds me....I haven't yet posted photos of my lovely cards from all my crafting friends. Watch this space....